Connecting to your Raspberry Pi from outside your local network can open up a world of possibilities, whether you're managing remote servers, accessing files, or controlling IoT devices. However, setting up this connection requires careful planning and configuration to ensure both functionality and security.
With the increasing demand for remote access solutions, Raspberry Pi has become a favorite device for hobbyists and professionals alike. Its versatility allows users to set up servers, run applications, or even act as a media center. However, to fully harness its potential, you need to know how to connect to your Raspberry Pi from anywhere in the world.
In this article, we'll walk you through the steps to connect to your Raspberry Pi outside your network. We'll cover everything from basic configurations to advanced security measures, ensuring you have a seamless and secure connection.
Read also:P Diddy Cassie A Comprehensive Look At Their Dynamic Relationship
Table of Contents
- Introduction to Remote Access
- Understanding Networks and Remote Connections
- Setting Up SSH on Raspberry Pi
- Configuring Port Forwarding
- Using Dynamic DNS for Remote Access
- Exploring VPN Solutions
- Security Measures for Remote Connections
- Troubleshooting Common Issues
- Tools and Software for Remote Access
- Conclusion
Introduction to Remote Access
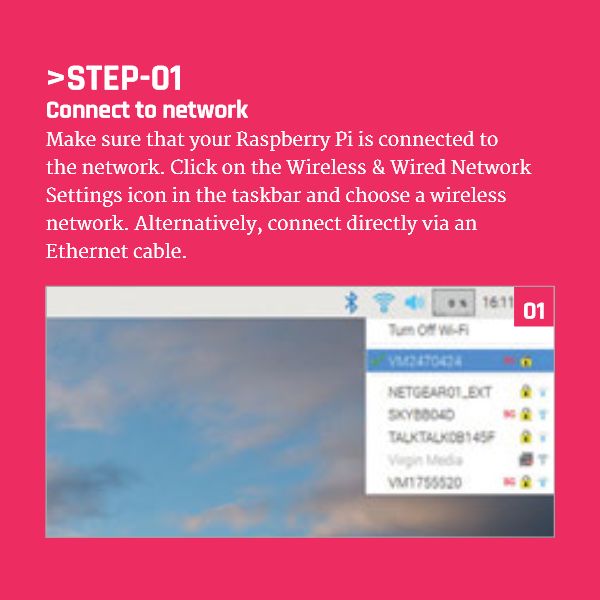
Remote access to your Raspberry Pi offers numerous advantages, such as controlling your device from anywhere, managing files, and running applications without being physically present. To connect to Raspberry Pi outside network, you'll need to configure your device and network properly.
Why Remote Access Matters
Remote access is essential for anyone who wants to utilize their Raspberry Pi beyond its local environment. Whether you're a developer, a home automation enthusiast, or a system administrator, having remote access ensures you can manage your device efficiently.
Additionally, remote access enables you to:
- Monitor and control IoT devices.
- Access files and data stored on your Raspberry Pi.
- Run scripts and applications remotely.
Understanding Networks and Remote Connections
Before diving into the technical aspects of connecting to Raspberry Pi outside network, it's important to understand how networks work and the concept of remote connections.
Local vs. External Networks
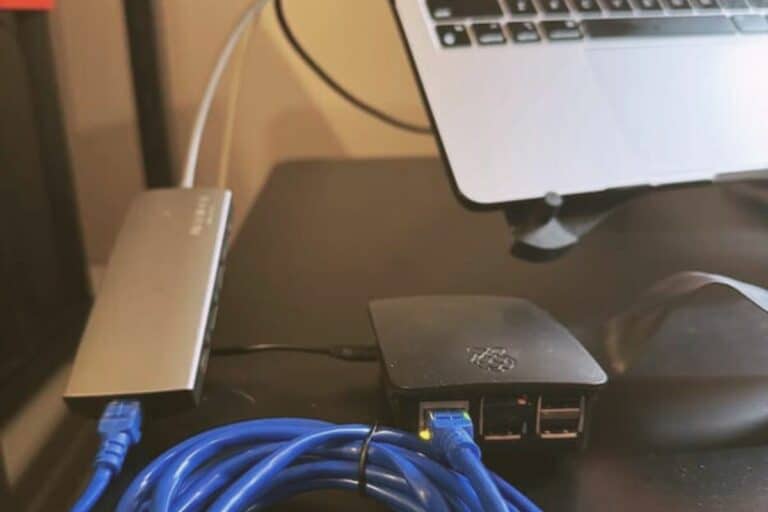
Your Raspberry Pi is typically connected to a local network via Wi-Fi or Ethernet. To access it from outside this network, you need to bridge the gap between your local and external networks.
This involves:
Read also:Mark Paul Gosselaar And Lark Voorhies Dated The Untold Love Story
- Configuring your router to allow external connections.
- Using protocols like SSH or VPN to establish a secure connection.
- Managing dynamic IP addresses with tools like Dynamic DNS.
Setting Up SSH on Raspberry Pi
SSH (Secure Shell) is one of the most common methods for connecting to Raspberry Pi outside network. It provides a secure way to access your device remotely.
Enabling SSH on Raspberry Pi
To enable SSH on your Raspberry Pi, follow these steps:
- Boot up your Raspberry Pi and log in.
- Open the terminal and type
sudo raspi-config. - Navigate to "Interfacing Options" and select "SSH".
- Choose "Yes" to enable SSH and reboot your device.
Once enabled, you can connect to your Raspberry Pi using an SSH client like PuTTY (Windows) or the built-in terminal (Mac/Linux).
Configuring Port Forwarding
Port forwarding is a crucial step in connecting to Raspberry Pi outside network. It allows traffic from the internet to reach your device through your router.
Steps to Configure Port Forwarding
Here's how you can set up port forwarding:
- Log in to your router's admin interface (usually via a web browser).
- Locate the "Port Forwarding" or "Virtual Servers" section.
- Add a new rule, specifying the external port (e.g., 22 for SSH) and the internal IP address of your Raspberry Pi.
- Save the changes and test the connection.
Port forwarding ensures that incoming requests are directed to the correct device on your network.
Using Dynamic DNS for Remote Access
Dynamic DNS (DDNS) is a service that maps your dynamic IP address to a static hostname. This is particularly useful if your internet service provider assigns a changing IP address to your router.
Setting Up DDNS
To use DDNS for connecting to Raspberry Pi outside network:
- Sign up for a DDNS service like No-IP or DuckDNS.
- Create a hostname and configure it to point to your router's public IP address.
- Install the DDNS client on your Raspberry Pi or router to update the hostname automatically.
With DDNS, you can access your Raspberry Pi using a consistent hostname, regardless of IP changes.
Exploring VPN Solutions
For added security, consider using a Virtual Private Network (VPN) to connect to Raspberry Pi outside network. A VPN encrypts your connection, making it harder for unauthorized users to intercept your data.
Types of VPNs
There are several types of VPNs you can use:
- WireGuard: A modern and lightweight VPN protocol that is easy to set up.
- OpenVPN: A widely used and secure protocol, though slightly more complex to configure.
- SoftEther: A versatile solution that supports multiple protocols.
Choose a VPN that suits your needs and follow the setup instructions provided by the service.
Security Measures for Remote Connections
Security should always be a top priority when connecting to Raspberry Pi outside network. Here are some best practices to protect your device:
Implementing Strong Authentication
- Use strong, unique passwords for SSH access.
- Enable two-factor authentication (2FA) if supported by your SSH client.
- Consider using SSH keys instead of passwords for added security.
Regularly Updating Your System
Keep your Raspberry Pi's operating system and software up to date to patch vulnerabilities and improve security.
Troubleshooting Common Issues
Even with proper configuration, you may encounter issues when connecting to Raspberry Pi outside network. Here are some common problems and their solutions:
Unable to Connect via SSH
- Ensure SSH is enabled on your Raspberry Pi.
- Verify that port forwarding is correctly set up on your router.
- Check your firewall settings to allow incoming SSH connections.
Dynamic IP Address Issues
- Ensure your DDNS client is running and updating the hostname regularly.
- Test the connection using the DDNS hostname instead of the IP address.
Tools and Software for Remote Access
Several tools and software can simplify the process of connecting to Raspberry Pi outside network. Here are some popular options:
SSH Clients
- PuTTY: A free and widely used SSH client for Windows.
- Terminal: Built-in SSH client for macOS and Linux.
VPN Services
- WireGuard: Lightweight and efficient for Raspberry Pi.
- ProtonVPN: Offers a free tier with basic features.
Conclusion
Connecting to your Raspberry Pi outside network is a powerful capability that can enhance your projects and streamline your workflow. By following the steps outlined in this guide, you can configure your device for remote access while maintaining a secure connection.
Remember to:
- Enable SSH and configure port forwarding on your router.
- Use Dynamic DNS to handle changing IP addresses.
- Implement security measures like strong authentication and regular updates.
We encourage you to share your experience or ask questions in the comments below. Additionally, explore other articles on our site for more tips and tutorials on Raspberry Pi and related technologies.